This page provides information on how you can use the EObjectTreeView. An EObjectTreeView is an extension of the JavaFx TreeView for handling an EObject hierarchy. EObjects are the basis of EMF, the Eclipse Modeling Framework.
An example
An example of the use of this EObject tree view can be found in the MyWorld application under Demo/Jfx/EObjectTreeView.

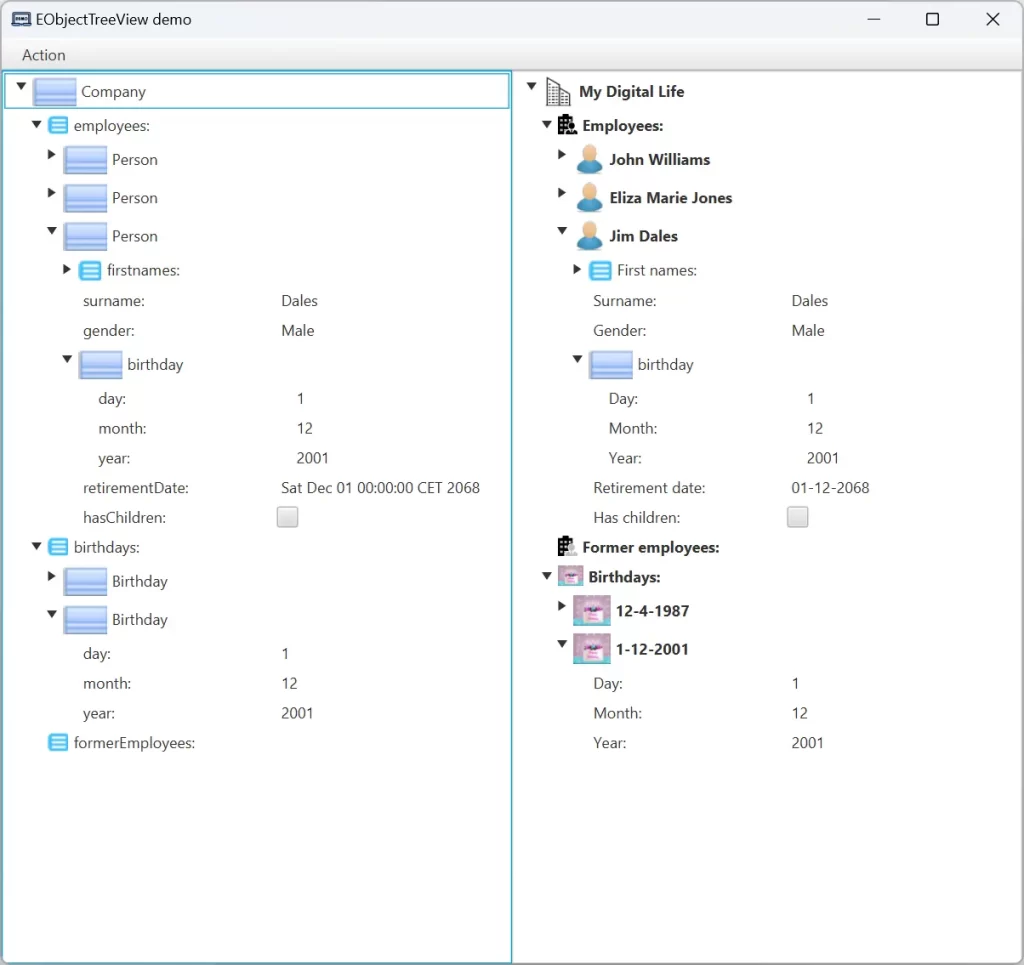
This demo shows two tree views of the same data. The tree view on the left doesn’t use any customization, it is simply created via: new EObjectTreeView().setEObject(company).
In this case the tree view shows all information using default graphics and names derived from the EObjects. You can check that this view already supports drag & drop, you can drag & drop any person to where a person can be placed in the model (under ‘Employees’ and ‘Former employees’).
The tree view on the right is highly customized with graphics, labels and formatters. How to do this is subject of the next sections. Let’s first look at functionality of an EObjectTable.
Functionality of an EObjectTreeView
- EObjectTreeView extends javafx.scene.control.TreeView
So all functionality of the JavaFx TreeView is available. - Customization of which parts are shown and how
The tree view is highly customizable. However this can also be completely omitted.
In this case all information is derived from the EObjects. - GUI customization
By default the customization is obtained viaDefaultCustomizationFx.getInstance(). But you can set the customization by specifying aCustomizationFx. - View mode/Edit mode
When you are browsing through the tree view, you don’t want to see all the attributes for which no value is provided. Therefore two different modes of operation are defined.
The tree view is either in ‘view mode’ or in ‘edit mode’. In ‘view mode’ attributes which have no value are not shown and the items cannot be changed,
in ‘edit mode’ all attributes are shown (unless the Descriptor specifies that there aren’t to be shown) and the items can be changed. - ObjectSelector
The tree view implements theObjectSelectorinterface. This normally provides an object of a specific type. A tree however contains items of different types.
This also means that some context information is required. ThereforeobjectSelected()provides the selected tree item (instead of the value).
It should be noted that from the tree item you can easily get its value, but the other way around is not easy and in case of simple values not possible. - Drag and Drop support
Via Drag and Drop EObjects can be moved within the tree. An EObject can of course only be moved to a location which supports the type of the item to be moved.
The move is a real move, meaning that the object is really moved (instead of creating a clone of the object and then deleting the object).
Apart from this standard functionality, it is possible to set functions to check whether a drop is possible and to handle the drop.
In the demo you can for example drag a ‘Person’ from the ‘Employees’ to the ‘Former employees’. - The tree view is updated on any change in the shown EObject hierarchy
Changes in the information shown in the tree are observed by the EObjectTreeView (using anorg.eclipse.emf.ecore.util.EContentAdapter). So also when the data is modified outside of the tree view, the tree view is updated.
The demo shows two tree views on the same data. If you drag and drop a ‘Person’ in one tree view you’ll see that the other tree view is also updated.
Customizing an EObjectTreeView
Creating a customized EObjectTreeView can best be done in a separate class, e.g. MyEObjectTreeViewCreator, with a method:
public EObjectTreeView createMyEObjectTreeView().
Lets take the code for the tree view demo as an example.
public class CompanyTreeViewCreator {

  public EObjectTreeView createCompanyTreeView() {
    EObjectTreeView eObjectTreeView = new EObjectTreeView()
        .setCustomization(createCustomization())
        .addEClassDescriptor(EMF_SAMPLE_PACKAGE.getCompany(), createDescriptorForCompany())
        .addEClassDescriptor(EMF_SAMPLE_PACKAGE.getPerson(), createDescriptorForPerson())
        .addEClassDescriptor(EMF_SAMPLE_PACKAGE.getBirthday(), createDescriptorForBirthday());

    return eObjectTreeView;
  }
  /**
   * Create a simple customization showing how to change the background color of the tree view.
   */
  private CustomizationFx createCustomization() {
    ...
  }

  /**
   * Create the descriptor for the EClass goedegep.emfsample.model.Company.
   */
  private EObjectTreeItemClassDescriptor createDescriptorForCompany() {
    ...
  }

  /**
   * Create the descriptor for the EClass goedegep.emfsample.model.Person.
   */
  private EObjectTreeItemClassDescriptor createDescriptorForPerson() {
    ...
  }

  /**
   * Create the descriptor for the EClass goedegep.emfsample.model.Birthday.
   */
  private EObjectTreeItemClassDescriptor createDescriptorForBirthday() {
    ...
  }
}
You start by creating the tree view. Then on this tree view you call the required customization methods. All these methods return the tree view.
The most important part of the customization is providing descriptors for the EClasses in your datamodel. Creating these descriptors can best be done in separate methods, as they usually require quite some lines of code.

